Exporting to Fbx: 3ds Max, Maya, and Blender
This guide covers the correct export to the Fbx file. Necessary settings are described for three tools: 3ds Max, Maya, and Blender.
Preparing scene in 3ds Max
In 3ds Max, bones or helpers or meshes can be used as the skinning bones.
However, for the SnowRunner engine:
- a helper has no difference from a bone, indeed – it is just a frame.
- but, a mesh is viewed by this engine as a frame with a cdt object.
The SnowRunner engine uses two types of frames:
- Frames of the physical model (“physical frames”) – these frames must have a cdt shape.
- Non-physical frames – a non-physical frame cannot have a shape. It is also a must.
We recommend you to use one of the following approaches for setting up a truck in 3ds Max:
- Approach #1: Editable Poles – for physical frames; Bones or helpers – for non-physical frames.
- Approach #2: All frames can be made using bones. Necessary cdt-meshes should be added as children of corresponding bones. Names of such meshes should start with “cdt”.
- Approach #3: If you reuse the setup from MudRunner, then you need to remove shapes on the non-physical bones. For example, you can do it using the DeleteMesh modifier.
Before export, we recommended you to use the Reset xForm utility for all objects.

All materials must have the correct names. Only Latin characters, digits, and “_” are allowed, names should not contain special characters (except “_”).
You only need to export skinned meshes, bones, and cdt meshes. Therefore, we recommend you to use Export > Export selection.

Export settings should be as follows:

Preparing scene in Maya
The unit settings in the scene should be as follows:

Export settings:

Preparing scene in Blender
NOTE: This document provides settings for Blender 2.82.
Scene settings
To ensure that the units in the scene and the game do match, the settings in Blender should look like the following:

With these settings, the import of the fbx-template can be done with the default settings of the importer.
Setup of the truck
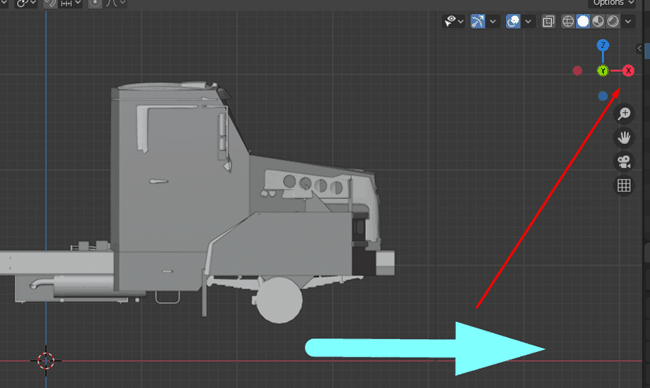
In the scene, the truck should be located in the direction of the X axis.

The orientation of the bones is important for the description of the truck behavior. Therefore, to achieve simpler and more convenient XML descriptions, we recommend you to build a skeleton using Keep Offset Parent.

Collision objects can be parented to physical bones as follows:

Armature
The architecture of the skeleton in Blender is different from the same architecture in most 3D tools. When exporting to Fbx, the system creates the additional Armature node, which is the root node of the skeleton. All skinned meshes are at the same level of hierarchy with this node.
The picture on the left displays the hierarchy after conversion from Maya or 3dsMax. The picture on the right shows how the hierarchy from Blender looks like.


Due to the creation of the additional Armature node, the engine converter cannot parent the skinned geometry under the root bone and forcedly creates the RootNode node by itself.
Wrong workaround for the Armature issue
In XML, you can explicitly specify the root bone using the ModelFrame attribute. In this case the extra nodes will be ignored.
However, in the case of this approach, the root frame will actually remain in the spawn point, since the root node remains in place. So, the system will incorrectly identify the coordinates of the truck. This will lead to the incorrect operation (for example, in the game, the zones on the map will not open).
Correct workaround for the Armature issue
Nodes that are not described in XML are ignored (they are forcedly attached to the parent nodes). Therefore, we may consider the RootNode, which was created during conversion, as a root physical bone. To work correctly in Havok, this node must have a collision object. So, for correct operation, you need to remove the cdt mesh from under the root bone and leave it at the same level with the Armature skeleton. In fact, we will have the RootNode as a physical bone responsible for working in Havok and the BoneRootNodeSkin as a skinning-bone responsible for the deformation of the geometry.

In the case of this approach, an explicit description of the root bone in XML is not necessary, but if you want to do it, then you need to remember that the RootNode is always the root.
Export Settings
To avoid exporting unnecessary things, use Export Selected Objects and disable the addition of leaf bones. The settings for that are shown below:


